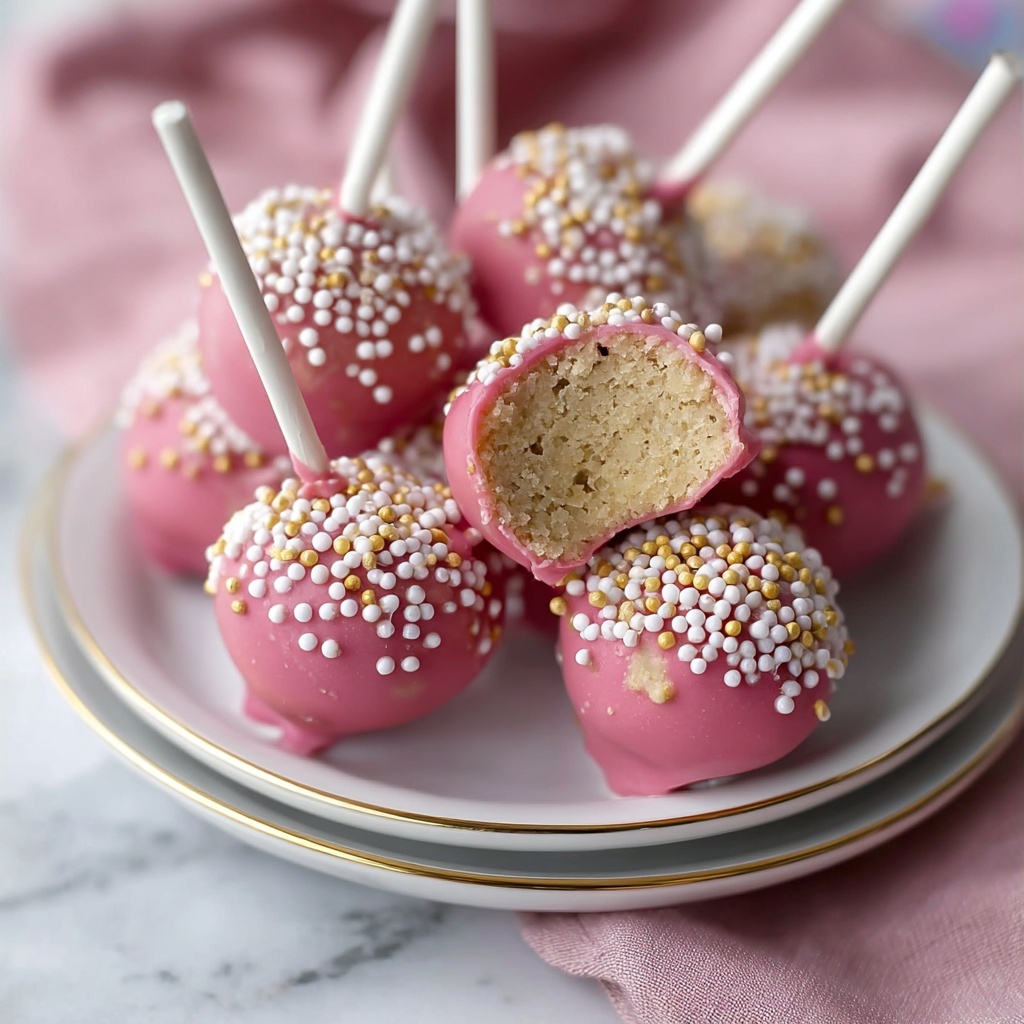
If you are searching for a fun, crowd-pleasing treat that is as delightful to make as it is to eat, look no further than these Birthday Cake Pops: A Deliciously Easy Recipe. Imagine moist, flavorful yellow cake transformed into perfect bite-sized spheres, dipped in luscious melted chocolate and decorated with vibrant sprinkles. These pops combine the charm of a birthday cake with the convenience of a handheld sweet, making them ideal for celebrations or simply indulging your sweet tooth. Once you make them once, you’ll wonder how you ever enjoyed birthday cake without these cheerful little delights.

Ingredients You’ll Need
The beauty of this recipe lies in its simplicity—the ingredients are easy to find and each one plays an essential role in delivering the perfect balance of flavor and texture. From the moist cake base to the creamy frosting and the chocolate coating, every component contributes to the irresistible appeal of these cake pops.
- Yellow cake mix: Provides a soft and classic cake foundation that’s moist and flavorful.
- Water: Hydrates the cake mix to ensure tenderness.
- Vegetable oil: Adds moisture for a delicate crumb.
- Large eggs: Bind the ingredients together and give structure.
- Unsalted butter (softened): Creates a rich, creamy frosting base without overpowering other flavors.
- Powdered sugar: Sweetens and thickens the frosting for easy mixing with cake crumbs.
- Milk: Adjusts frosting consistency for perfect blending.
- Vanilla extract: Enhances the cake flavor with a warm vanilla note.
- Pinch of salt: Balances sweetness and highlights flavors.
- White chocolate candy melts: Provide a smooth, sweet coating that is perfect for decorating.
- Milk chocolate candy melts: Offer a delicious alternative chocolate coating with a richer flavor.
- Assorted sprinkles: Add festive colors and textures to make each pop pop with personality.
- Lollipop sticks: Enable easy dipping and fun presentation.
- Styrofoam block: Handy for displaying your finished cake pops upright and securely.
How to Make Birthday Cake Pops: A Deliciously Easy Recipe
Step 1: Bake the Cake
Preheat your oven to 350°F (175°C) and prepare a 9×13 inch pan by greasing and flouring it thoroughly. Mix the yellow cake mix, water, vegetable oil, and eggs in a large bowl, beating on medium speed until the batter is smooth and lump-free. Pour this into your pan and bake for 25 to 30 minutes. You’ll know it’s ready when a wooden skewer inserted into the center comes out clean. Let the cake cool completely in the pan before moving on to the next step to ensure the frosting won’t melt.
Step 2: Make the Frosting
Beat the softened butter with an electric mixer until it’s light and fluffy, about 3 to 5 minutes. Add the powdered sugar gradually—one cup at a time—beating well after each addition, then add milk and vanilla extract. Continue beating until smooth and creamy. The frosting should be luscious but not too runny, so adjust with extra powdered sugar or a splash of milk as needed. A pinch of salt at the end will amplify all those wonderful flavors.
Step 3: Combine Cake and Frosting
Crumble your cooled cake carefully into a large mixing bowl. Slowly stir in the frosting, mixing thoroughly until you have a uniform, moldable consistency that holds together without being sticky. If it feels dry, add a tablespoon of milk to loosen the mixture slightly. For best results, refrigerate the mixture for at least 30 minutes; this makes rolling your pops a breeze.
Step 4: Form the Cake Pops
Using a cookie scoop or your hands, roll the chilled cake-frosting mixture into 1-inch balls. Place them on a parchment-lined baking sheet and pop them into the freezer for at least 30 minutes. Freezing is crucial because it helps the cake pops keep their shape when dipped in chocolate later.
Step 5: Dip and Decorate
While the cake balls chill, melt your white chocolate candy melts according to package instructions. Remove the frozen cake balls and gently insert a lollipop stick halfway into each one. Dip each cake pop carefully into the melted chocolate, tapping off any excess. Immediately add sprinkles while the coating is still wet for a festive finish. Place the dipped pops on parchment paper and let the chocolate set—this usually takes about 30 minutes. For variety, repeat the dipping process with milk chocolate melts and a different set of sprinkles if you like.
Step 6: Display Your Creation
Once the coating is fully set, stick your cake pops into a Styrofoam block for a charming presentation. Decorate further by tying ribbons or using decorative papers to match any party theme. These pops are as pretty to look at as they are delicious to gobble up.
How to Serve Birthday Cake Pops: A Deliciously Easy Recipe

Garnishes
The fun of Birthday Cake Pops: A Deliciously Easy Recipe is how versatile they are with garnishes. Think beyond typical sprinkles—try edible glitter, crushed candy canes, or finely chopped nuts to add texture and spark conversation. Garnishes don’t just make these pops prettier; they add layers of flavor and personality to every bite.
Side Dishes
These cake pops are perfect party treats but pairing them with fresh fruit skewers, creamy yogurt parfaits, or even a refreshing lemonade can balance the sweetness beautifully. Their bite-sized nature means they’re great with small plates, making your spread look and taste wonderfully varied.
Creative Ways to Present
Beyond placing them in Styrofoam blocks, you can use colorful jars filled with candy, small flower pots with faux soil made from crushed cookies, or creatively wrapped bundles for gifting. Using personalized tags or mini chalkboards can also add a sweet personal touch and elevate your presentation from simple to spectacular.
Make Ahead and Storage
Storing Leftovers
If you happen to have leftovers (though it’s hard to resist!), keep your birthday cake pops in an airtight container in the refrigerator. They’ll stay fresh and delicious for up to a week. Be sure to let them come to room temperature before serving to enjoy the best texture and flavor.
Freezing
Birthday Cake Pops: A Deliciously Easy Recipe freeze beautifully, which means you can make a batch well in advance. To freeze, place the cake pops on a parchment-lined tray until solid, then transfer to a freezer-safe container or zipped bag. They can be stored for up to 3 months. When you’re ready to serve, thaw overnight in the refrigerator to preserve their shape and taste.
Reheating
Since these pops are best enjoyed cool or at room temperature, reheating isn’t necessary. If you want to freshen them up slightly, just let them sit at room temperature for about 20 minutes—this softens the cake and enhances the flavor without melting the chocolate shell.
FAQs
Can I use a homemade cake instead of a cake mix?
Absolutely! Feel free to use your favorite homemade yellow cake recipe. Just make sure the cake is fully cooled before mixing it with frosting to maintain the right texture for rolling cake pops.
What if I don’t have candy melts for dipping?
You can substitute regular chocolate chips or bars—just melt them slowly over a double boiler and add a bit of vegetable oil to keep the chocolate smooth and easy to dip.
How can I prevent the cake pops from falling off the sticks?
Dipping the tip of the lollipop sticks into melted chocolate before inserting them into the cake balls helps create a glue-like seal that holds everything together securely.
Can I make these cake pops vegan or gluten-free?
Yes! Use a vegan or gluten-free cake mix and adjust frosting ingredients accordingly. There are many plant-based butter and sugar alternatives that work wonderfully in this recipe.
How long do the cake pops last once made?
Stored in an airtight container in the refrigerator, these cake pops stay fresh for up to one week. After that, the cake may start to dry out and the chocolate coating could lose its firmness.
Final Thoughts
There’s something truly magical about Birthday Cake Pops: A Deliciously Easy Recipe—they combine all the joy of cake with an easy, playful twist that you and your friends will love. Whether it’s for a special occasion or just a sweet pick-me-up, making these cake pops is a fun way to share happiness, one pop at a time. So gather your ingredients, roll up your sleeves, and enjoy the sweet satisfaction of creating these charming treats!
Print
Birthday Cake Pops: A Deliciously Easy Recipe
- Prep Time: 45 minutes
- Cook Time: 30 minutes
- Total Time: 1 hour 45 minutes
- Yield: 24 cake pops
- Category: Dessert
- Method: Baking
- Cuisine: American
Description
These Birthday Cake Pops are a fun and delightful treat, combining moist yellow cake with creamy buttercream frosting, all covered in smooth white or milk chocolate and decorated with colorful sprinkles. Perfect for parties or celebrations, these cake pops are easy to make and fun to customize.
Ingredients
Cake
- 1 box (15.25 ounces) yellow cake mix
- 1 cup water
- 1/3 cup vegetable oil
- 3 large eggs
Buttercream Frosting
- 1 cup (2 sticks) unsalted butter, softened
- 3 cups powdered sugar
- 1/4 cup milk
- 1 teaspoon vanilla extract
- Pinch of salt
Decoration
- 6 ounces white chocolate candy melts
- 6 ounces milk chocolate candy melts
- Assorted sprinkles
- Lollipop sticks
- Styrofoam block for display
Instructions
- Preheat and Prepare Pan: Preheat your oven to 350°F (175°C). Grease and flour a 9×13 inch baking pan to prevent the cake from sticking.
- Mix Cake Batter: In a large bowl, combine the yellow cake mix, water, vegetable oil, and eggs. Beat on medium speed for 2 minutes until the batter is smooth and well blended.
- Bake Cake: Pour the batter into the prepared pan and bake for 25-30 minutes. Test doneness by inserting a wooden skewer into the center; it should come out clean.
- Cool Cake: Allow the cake to cool completely in the pan before proceeding to make the frosting.
- Make Buttercream Frosting: Beat the softened unsalted butter until light and fluffy, about 3-5 minutes. Gradually add powdered sugar one cup at a time, mixing well after each addition.
- Add Milk and Vanilla: Stir in the milk and vanilla extract, beating until the frosting is smooth and creamy. Adjust the consistency with additional milk or powdered sugar as needed.
- Season Frosting: Add a pinch of salt to balance the sweetness and blend thoroughly.
- Crumble Cake: Crumble the cooled cake into a large bowl until it has a fine, even texture.
- Combine Cake and Frosting: Add the prepared frosting to the crumbled cake and mix until evenly combined. If the mixture feels too dry, add a tablespoon of milk at a time until it holds together well.
- Chill Mixture: Refrigerate the combined cake and frosting mixture for at least 30 minutes to make it easier to handle.
- Shape Cake Pops: Roll the chilled mixture into 1-inch balls, using a cookie scoop if desired, and place them on a parchment-lined baking sheet.
- Freeze Cake Pops: Freeze the shaped cake balls for at least 30 minutes to firm up.
- Melt White Chocolate: Melt the white chocolate candy melts according to package directions, typically in short bursts in the microwave or using a double boiler.
- Insert Sticks: Insert a lollipop stick halfway into each frozen cake ball, ensuring they are secure.
- Dip in White Chocolate: Dip each cake pop into the melted white chocolate, tapping off any excess coating gently.
- Decorate: Immediately sprinkle the dipped cake pops with assorted sprinkles before the chocolate sets.
- Let Chocolate Set: Place the decorated cake pops on parchment paper and allow the chocolate coating to set, about 30 minutes.
- Repeat with Milk Chocolate: Optionally, melt the milk chocolate candy melts and repeat the dipping and decorating process with different sprinkles for variety.
- Display Cake Pops: Insert the cake pops into a Styrofoam block for easy and attractive display.
- Optional Decoration: Add a ribbon or decorative paper around the sticks to enhance presentation.
Notes
- For best results, make sure the cake is completely cooled before mixing with frosting.
- Refrigerating the cake-frosting mixture makes it easier to roll into balls without crumbling.
- Use a cookie scoop to achieve uniform cake pops for even sized treats.
- Freezing the cake balls before dipping helps the coating adhere and prevents them from falling apart.
- Store cake pops in an airtight container in the refrigerator for up to 5 days.
- You can use different candy melts colors and sprinkles to customize for themes or occasions.

