
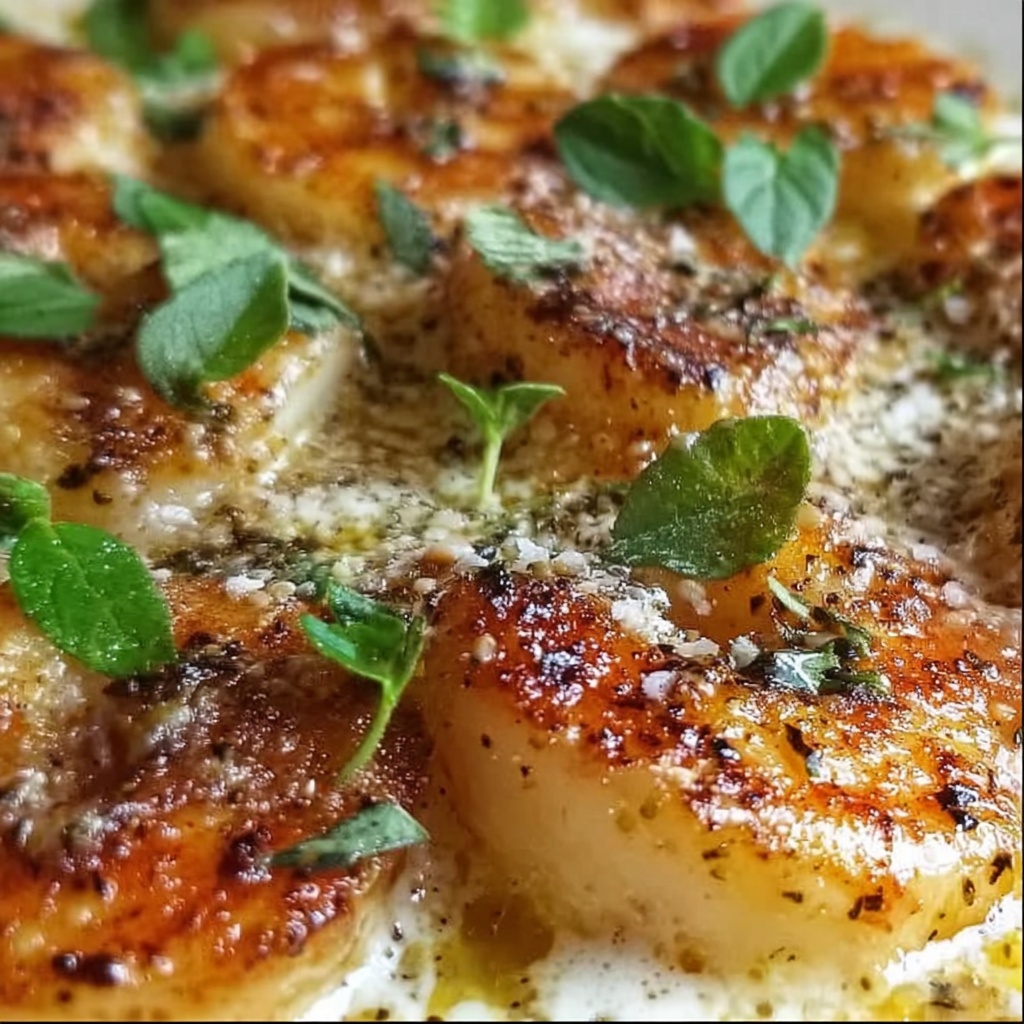
If you’re craving a flavorful dinner that’s both satisfying and easy to make, you’ve got to try this Crispy Caesar Chicken Breasts Recipe. It’s everything you love about Caesar salad transformed into a crispy, golden crust wrapped around tender, juicy chicken breasts. The combination of crunchy panko, salty Parmesan, and creamy Caesar dressing creates a bold flavor profile that’s guaranteed to become a new family favorite. Plus, the simplicity of the ingredients and straightforward steps make it a perfect go-to recipe for a weeknight dinner or a casual gathering with friends.
Ingredients You’ll Need
These ingredients are simple, smart, and essential for delivering that perfect balance of savory, crunchy, and fresh in every bite. Each one plays a key role, from adding zest and moisture to creating a golden, crispy crust that locks in the juiciness of the chicken.
- 4 boneless, skinless chicken breasts: The star of the dish, providing a lean and juicy base.
- 1/2 cup Caesar dressing: Adds a creamy, tangy flavor that infuses the chicken.
- 1/4 cup Parmesan cheese, grated: Brings a salty richness that complements the dressing perfectly.
- 1 cup panko breadcrumbs: Creates the irresistibly crispy coating everyone loves.
- 1 teaspoon garlic powder: Gives a subtle punch that enhances the overall taste.
- 1 tablespoon olive oil: Helps crisp up the crust while baking for that golden finish.
- Zest of 1 lemon (optional): Adds a fresh, bright citrus note to lift the flavors.
How to Make Crispy Caesar Chicken Breasts Recipe
Step 1: Preheat the Oven
Start by setting your oven to 400°F (200°C). This high heat is perfect for achieving that beautiful golden crust while cooking the chicken all the way through. Prepare a baking sheet by lining it with parchment paper or lightly greasing it to prevent sticking and make cleanup easier.
Step 2: Prepare the Chicken
Pat the chicken breasts dry with paper towels before you begin. This little step is crucial because it helps the Caesar dressing and breadcrumb coating adhere better, giving you a crispier final texture.
Step 3: Coat the Chicken
In a shallow dish, mix together the Caesar dressing and garlic powder. Next, dip each chicken breast into this flavorful mixture, making sure it’s fully covered. Then press the coated chicken into a second dish containing the panko breadcrumbs and grated Parmesan cheese, ensuring an even and thorough coating on both sides. This step guarantees every bite has that addictive crunch combined with rich, cheesy goodness.
Step 4: Add Olive Oil
Place the coated chicken breasts carefully on your prepared baking sheet. Drizzle the olive oil over the top—this helps the coating crisp up beautifully while baking, contributing to that classic golden texture we’re after.
Step 5: Bake the Chicken
Bake your chicken in the preheated oven for 25 to 30 minutes. You want the internal temperature to reach 165°F (74°C) to ensure it’s safely cooked but still juicy inside. When the coating turns golden and crispy, it’s time to take the chicken out and get ready for the finishing touches.
Step 6: Optional Lemon Zest
To brighten and elevate the flavors, sprinkle some fresh lemon zest over the chicken just before serving. This citrusy pop adds unexpected freshness and perfectly complements the savory, cheesy coating.
How to Serve Crispy Caesar Chicken Breasts Recipe
Garnishes
A sprinkle of extra grated Parmesan and a few fresh basil or parsley leaves can take your presentation to the next level and add an herbal note that enhances the overall dish beautifully.
Side Dishes
This Crispy Caesar Chicken Breasts Recipe pairs wonderfully with light and vibrant sides like a crisp Caesar salad, roasted vegetables, or even a simple linguine tossed with garlic and olive oil. These sides won’t compete with the chicken but will round out your meal perfectly.
Creative Ways to Present
For a fun twist, slice the chicken and serve it atop a bed of mixed greens or inside a fresh ciabatta roll with extra Caesar dressing for a gourmet chicken sandwich. Another idea is to arrange slices over creamy mashed potatoes for comfort food vibes with a crispy, flavorful punch.
Make Ahead and Storage
Storing Leftovers
Allow any leftovers to cool completely, then store them in an airtight container in the refrigerator for up to 3 days. Keeping the chicken uncovered briefly before reheating helps maintain some of the crust’s crispiness.
Freezing
If you want to save some for later, wrap each crispy chicken breast tightly in plastic wrap and place them in a freezer-safe container or bag. They’ll keep well for up to 2 months, making meal prep easy for busy weeks.
Reheating
To best preserve the crisp texture, reheat your chicken breasts in a 375°F (190°C) oven for about 10-12 minutes instead of using a microwave. This way, the coating stays crunchy and the inside remains tender and juicy.
FAQs
Can I use frozen chicken breasts for this recipe?
You can, but be sure to fully thaw them first and pat them dry to ensure the Caesar dressing and crumb coating stick properly. Cooking times may vary slightly depending on thickness.
Is this recipe suitable for gluten-free diets?
To make it gluten-free, swap the panko breadcrumbs with gluten-free breadcrumbs and double-check that your Caesar dressing contains no gluten ingredients.
Can I grill the chicken instead of baking?
While grilling won’t produce the same crispy crust as baking, you can try grilling after coating, but be careful as the crumbs may burn easily. Baking is best for that signature crunch.
What can I substitute for Caesar dressing if I don’t have any?
A homemade mix of mayonnaise, lemon juice, anchovy paste, garlic, and grated Parmesan can work as a great substitute, recreating that classic Caesar flavor profile.
How do I know when the chicken is perfectly cooked?
The safest way is to check the internal temperature with a meat thermometer—165°F (74°C) means it’s fully cooked, juicy, and safe to eat. The coating should be golden and crisp for the best experience.
Final Thoughts
There’s just something incredibly satisfying about the Crispy Caesar Chicken Breasts Recipe that makes it an instant favorite in any kitchen. It’s a dish that combines familiar, comforting flavors with a crispy texture that delights every bite. Trust me, once you make this, it’ll be hard to resist coming back for seconds. Give it a try, and prepare yourself for an easy, flavorful meal that feels just a bit special every single time.
Print
Crispy Caesar Chicken Breasts Recipe
- Prep Time: 10 minutes
- Cook Time: 25-30 minutes
- Total Time: 40 minutes
- Yield: 4 servings
- Category: Main Course
- Method: Baking
- Cuisine: American
Description
This Crispy Caesar Chicken Breasts recipe features tender, juicy chicken coated in creamy Caesar dressing and crispy Parmesan-panko crust, baked to golden perfection in the oven. It’s a quick and delicious meal perfect for weeknight dinners or special occasions, with optional lemon zest adding a bright, fresh citrus note.
Ingredients
Chicken
- 4 boneless, skinless chicken breasts
Coating
- 1/2 cup Caesar dressing
- 1 teaspoon garlic powder
- 1 cup panko breadcrumbs
- 1/4 cup Parmesan cheese, grated
Others
- 1 tablespoon olive oil
- Zest of 1 lemon (optional, for a fresh citrusy note)
Instructions
- Preheat the Oven: Preheat your oven to 400°F (200°C). Line a baking sheet with parchment paper or lightly grease it to prevent sticking and make cleanup easier.
- Prepare the Chicken: Pat the chicken breasts dry with paper towels to remove excess moisture, which helps the coating adhere better.
- Coat the Chicken: In a shallow dish, combine the Caesar dressing and garlic powder. Dip each chicken breast into the dressing mixture, ensuring it’s evenly coated on all sides. Then, dip the chicken into the panko breadcrumbs mixed with grated Parmesan cheese, pressing gently to ensure thorough and even coverage.
- Add Olive Oil: Place the coated chicken breasts on the prepared baking sheet. Drizzle the olive oil evenly over the chicken to aid in crisping the crust during baking.
- Bake the Chicken: Bake in the preheated oven for 25-30 minutes, or until the chicken breasts are cooked through. The internal temperature should reach 165°F (74°C), and the coating should be golden brown and crispy.
- Optional Lemon Zest: For added freshness and a bright citrus flavor, sprinkle the chicken with lemon zest just before serving.
- Serve: Serve the crispy Caesar chicken breasts with your choice of side such as steamed vegetables, pasta, or a fresh green salad. Enjoy the savory, crunchy perfection!
Notes
- Be sure to pat the chicken dry before coating to help the breading stick better.
- Using panko breadcrumbs creates a crispier crust than regular breadcrumbs.
- The olive oil drizzle is essential for achieving a golden, crispy texture when baking.
- Check the internal temperature with a meat thermometer to ensure chicken is safely cooked.
- Lemon zest is optional but adds a wonderful brightness to the dish.
- Leftovers can be stored in the refrigerator for up to 3 days and reheated in the oven for best texture.


