
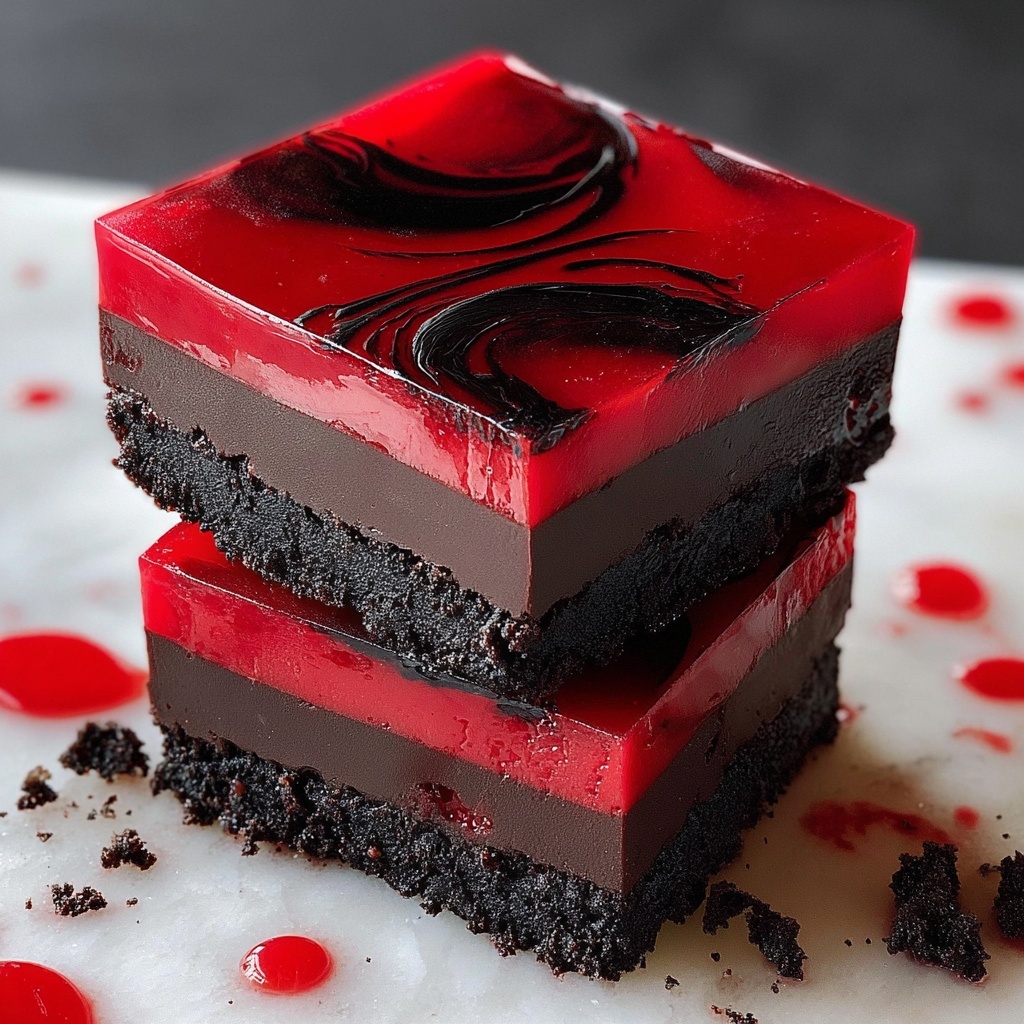
If you love the rich, irresistible combo of chocolate and peanut butter with a fun, spooky twist, you are going to adore this Vampire Fudge: A Spooky Chocolate and Peanut Butter Treat Recipe. It’s a festive and delicious fudge that captures that perfect blend of creamy, sweet, and just a hint of daring red that makes it ideal for any Halloween gathering or when you want a treat that stands out. Each bite offers velvety chocolate mixed with luscious peanut butter ribbons, creating a decadent texture and flavor you’ll crave again and again. This recipe is as fun to make as it is to eat, bringing a little spooky spirit to your kitchen while delivering a classic crowd-pleaser.
Ingredients You’ll Need
Gathering your ingredients is the easy part of this Halloween delight. Every single ingredient plays a key role: from the richness of butter and smoothness of peanut butter to the perfect melting of chocolate chips, this recipe relies on simple pantry staples turned extraordinary.
- Unsalted butter: Provides the creamy base that melts smoothly and binds the fudge together perfectly.
- Sweetened condensed milk: Adds sweetness and gives the fudge its luscious, dense texture without any graininess.
- Semi-sweet chocolate chips: Offer that classic chocolate depth and slight bitterness, balancing the sweetness.
- Milk chocolate chips: Bring extra creamy sweetness to complement the semi-sweet chips and enhance flavor complexity.
- Creamy peanut butter: Introduces a rich, nutty contrast that is smooth and luscious in every bite.
- Vanilla extract: A hint of warmth and aromatic flavor that brightens the fudge.
- Powdered sugar: Sweetens and thickens the peanut butter mixture to help it swirl beautifully in the fudge.
- Unsweetened cocoa powder: Adds a touch of natural chocolate intensity and deepens the fudge’s color.
- Red food coloring gel: Just a tiny bit gives the peanut butter swirl that dramatic, vampiric red that makes this treat truly festive.
- Optional garnishes: Pretzel sticks for crunch, crushed Oreos, or chopped nuts – these all add texture and extra fun to the presentation.
How to Make Vampire Fudge: A Spooky Chocolate and Peanut Butter Treat Recipe
Step 1: Prepare Your Pan
Start by lining an 8×8 inch baking pan with parchment paper, leaving an overhang on the sides. This little step makes lifting the fudge out a breeze once it’s set, so your perfectly formed squares come out clean and neat.
Step 2: Melt the Butter
In a large saucepan over medium-low heat, slowly melt the unsalted butter, stirring just occasionally. A gentle melt ensures the butter doesn’t brown, keeping the texture silky smooth.
Step 3: Add Sweetened Condensed Milk
Whisk in the sweetened condensed milk gradually to the melted butter until you have a smooth, unified base. This magically thickens the mixture and provides that sumptuous sweetness that fudge is famous for.
Step 4: Melt the Chocolate Chips
Add both the semi-sweet and milk chocolate chips to the pan, stirring constantly so they melt evenly into a glossy, luscious liquid. This blend of chocolates creates a rich, well-rounded cocoa flavor.
Step 5: Stir in Vanilla
Remove the pan from heat and mix in the teaspoon of vanilla extract. This subtle addition elevates your fudge, adding aromatic warmth and complexity to every bite.
Step 6: Prepare the Peanut Butter Mixture
In a separate bowl, combine the creamy peanut butter and powdered sugar. Stir until the mix is smooth and creamy, perfect for swirling into the chocolate fudge.
Step 7: Add Spooky Red Coloring
Mix a tiny amount of red food coloring gel into the peanut butter mix. This gives the peanut butter swirls the signature spooky red that’ll make your Vampire Fudge: A Spooky Chocolate and Peanut Butter Treat Recipe really come alive.
Step 8: Layer the Fudge
Pour half of the chocolate mixture into your prepared pan and spread evenly with a spatula. This forms the bottom rich chocolate layer.
Step 9: Swirl the Red Peanut Butter
Spoon dollops of the red peanut butter mixture over the chocolate layer and gently swirl with a toothpick or knife. This creates that iconic vampire-blood effect that’s both eerie and beautiful.
Step 10: Add the Remaining Chocolate
Pour the rest of the chocolate chip mixture over the peanut butter swirls, then carefully spread it evenly to cover the swirls but keep the visual effect striking.
Step 11: Add Optional Garnishes
Sprinkle pretzel sticks, crushed Oreos, or chopped nuts on top for added texture and an extra touch of Halloween fun.
Step 12: Chill
Cover the pan tightly with plastic wrap and refrigerate your Vampire Fudge: A Spooky Chocolate and Peanut Butter Treat Recipe for at least 4 hours, or better yet, overnight to set perfectly.
Step 13: Cut and Serve
Lift the fully set fudge out of the pan using the parchment overhang, then slice into small squares with a sharp knife, wiping the blade clean between cuts for neat edges. Arrange on your serving platter and get ready to wow your friends!
How to Serve Vampire Fudge: A Spooky Chocolate and Peanut Butter Treat Recipe

Garnishes
Adding pretzel sticks or crushed Oreos on top is more than decorative; those crunchy garnishes contrast beautifully with the fudge’s creamy texture. Nuts add a satisfying bite and help balance the sweet richness.
Side Dishes
This fudge pairs magically with a steaming cup of black coffee or a cold glass of milk to cut through the richness. For a festive touch, serve alongside pumpkin-flavored treats or spiced candles for ambiance.
Creative Ways to Present
Consider placing your fudge squares on skull-shaped plates or wrapping them in clear cellophane tied with a black and red ribbon to match the vampire theme. You could also stack the squares to resemble a little haunted castle of chocolate delights—guaranteed to impress.
Make Ahead and Storage
Storing Leftovers
Keep the fudge in an airtight container in the refrigerator to maintain its creamy texture and fresh flavor. It should stay perfect for up to two weeks, making it a great make-ahead sweet for parties or gifts.
Freezing
If you want to save your Vampire Fudge: A Spooky Chocolate and Peanut Butter Treat Recipe for longer, wrap pieces individually in plastic wrap, then place in a freezer-safe bag or container. It freezes well for up to 3 months without losing quality.
Reheating
This fudge is best enjoyed chilled and firm, so reheating isn’t necessary. If you prefer a slightly softer texture, let it sit at room temperature for 15-20 minutes before serving to bring out those luscious flavors fully.
FAQs
Can I use crunchy peanut butter instead of creamy?
You can, but creamy peanut butter is recommended for smooth swirls and even mixing. Crunchy peanut butter might affect the texture and swirl pattern, although it can add interesting crunch.
Is there a way to make this fudge dairy-free or vegan?
This recipe relies heavily on dairy ingredients like butter and sweetened condensed milk, so substitutions would require significant adjustments. Look for vegan butter and sweetened condensed coconut milk alternatives to experiment.
What if I don’t have red food coloring gel? Can I use liquid coloring?
Gel coloring is best because it’s more concentrated and won’t affect the peanut butter mixture’s consistency. Liquid colorings may thin it out, so use sparingly if needed.
Can I use only one type of chocolate chips?
Yes, but combining semi-sweet and milk chocolate chips delivers the best balance of flavor and smoothness. Using only one type might make the fudge too sweet or too bitter for some palates.
How thick should I make the peanut butter mixture?
The peanut butter and powdered sugar should be thick yet spreadable so it holds shape when swirled. If too thin, the vibrant red swirls will bleed into the chocolate.
Final Thoughts
There’s something truly magical about the way this Vampire Fudge: A Spooky Chocolate and Peanut Butter Treat Recipe turns simple ingredients into an unforgettable, festive delight. Whether you’re celebrating Halloween or just craving a chocolaty, peanut buttery indulgence with a twist, this recipe will become your go-to crowd-pleaser. So grab your ingredients, gather your spooky spirit, and let the fun begin—this fudge is waiting to become your sweet obsession!
Print
Vampire Fudge: A Spooky Chocolate and Peanut Butter Treat Recipe
- Prep Time: 20 minutes
- Cook Time: 10 minutes
- Total Time: 4 hours 30 minutes
- Yield: 16 servings
- Category: Dessert
- Method: Stovetop
- Cuisine: American
Description
Vampire Fudge is a decadent and spooky sweet treat perfect for Halloween or any festive occasion. This layered chocolate fudge combines creamy peanut butter swirls tinted with a dramatic red hue alongside rich semi-sweet and milk chocolate layers. Topped optionally with pretzels, crushed Oreos, or chopped nuts for extra texture, this visually striking dessert is as delicious as it is fun to make and share.
Ingredients
Main Ingredients
- 1 cup (2 sticks) unsalted butter
- 1 (14 ounce) can sweetened condensed milk
- 1 (12 ounce) bag semi-sweet chocolate chips
- 1 (12 ounce) bag milk chocolate chips
- 1 cup creamy peanut butter
- 1 teaspoon vanilla extract
- 1/2 cup powdered sugar
- 1/4 cup unsweetened cocoa powder
- Red food coloring gel (a tiny amount, for dramatic effect)
Optional Garnishes
- Pretzel sticks
- Crushed Oreos
- Chopped nuts
Instructions
- Prepare Pan: Line an 8×8 inch baking pan with parchment paper, leaving an overhang on the sides to easily lift the fudge out later.
- Melt Butter: In a large saucepan over medium-low heat, melt the butter completely while stirring occasionally to prevent burning.
- Add Condensed Milk: Gradually whisk in the sweetened condensed milk ensuring the mixture stays smooth and well combined.
- Melt Chocolate: Add both semi-sweet and milk chocolate chips to the butter mixture, stirring constantly until the chocolate is fully melted and the mixture is glossy.
- Flavor: Stir in the vanilla extract to enhance the flavor depth of the fudge base.
- Prepare Peanut Butter Mixture: In a separate bowl, combine creamy peanut butter and powdered sugar until smooth and creamy, then mix in a small amount of red food coloring gel to achieve a vivid red color.
- First Chocolate Layer: Pour half of the chocolate mixture into the prepared pan and spread it out evenly to form a smooth layer.
- Add Peanut Butter Swirls: Spoon dollops of the red peanut butter mixture evenly over the chocolate layer, then gently swirl it into the chocolate using a knife or skewer to create a marbled effect.
- Top with Chocolate: Pour the remaining chocolate mixture over the peanut butter swirls and spread evenly to completely cover the layer beneath.
- Add Garnishes: Sprinkle optional pretzels, crushed Oreos, or chopped nuts on top for added texture and visual appeal.
- Chill: Cover the pan tightly with plastic wrap and refrigerate for at least 4 hours, or preferably overnight, to allow the fudge to firm up properly.
- Slice and Serve: Use the parchment paper overhang to lift the fudge out of the pan. Cut into small squares with a sharp knife, wiping the knife clean between cuts for clean edges. Arrange on a serving platter and serve chilled.
Notes
- Allow the fudge to chill thoroughly to ensure clean slicing and best texture.
- Use a sharp knife and wipe it between cuts to maintain neat squares.
- Substitute peanut butter with a nut-free alternative for allergies.
- The red food coloring gel is optional but adds a dramatic vampire-inspired visual effect.
- Store leftovers in an airtight container in the refrigerator for up to one week.


